시작하기 앞서 Ingest Pipeline이란
Elasticsearch에서 Ingest Pipeline은 데이터를 색인하기 전에 전처리 및 변환 작업을 수행하는 개념입니다. Ingest Pipeline은 데이터를 가져와서 필요한 형식으로 변환하거나 데이터를 필터링하고 파싱 하는 등의 작업 및 데이터의 일관성을 유지하는데 매우 유용하여 효율적인 데이터 처리를 가능하게 하는 중요한 기능입니다.

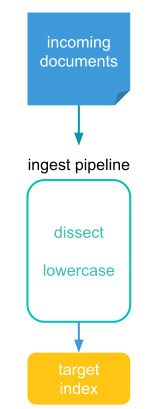
그림에 보이는 것과 같이 데이터가 들어오면 Ingest pipeline을 통하여 순차적으로 프로세서가 실행되고 결과물은 해당 인덱스에 저장됩니다. Ingest Pipeline이 동작할 수 있도록 해당 노드에는 ingest role이 등록되어야 하지만 일반적으로 데이터 노드에 많이 사용합니다. 허나 프로세서가 많아 부하를 많이 받을 경우 노드를 별도로 분리하는 방법을 고려해 볼 필요성이 있습니다.
이번 문서에서는 여러 유용한 파이프라인 프로세서 중 json에 대해서 실습해봤습니다.
만약 JSON Pipeline을 사용하지 않았다면
만약 JSON Pipeline을 사용하지 않았다면 데이터가 Text형식으로 문자열 그대로 저장되어 통계를 내거나 보다 자세한 데이터 처리를 하는데 많은 제약이 있을 수 있습니다. 아래는 JSON Pipeline을 사용하지 않았을 때의 데이터 형식입니다.
### 데이터 검색
GET http://localhost:9200/my-manifests/_search

### 결과
{
  "took": 4,
  "timed_out": false,
  "_shards": {
    "total": 1,
    "successful": 1,
    "skipped": 0,
    "failed": 0
  },
  "hits": {
    "total": {
      "value": 1,
      "relation": "eq"
    },
    "max_score": 1.0,
    "hits": [
      {
        "_index": "my-manifests",
        "_id": "1",
        "_score": 1.0,
        "_source": {
          "cluster": "my-cluster",
          "manifest": "{\"cluster\":\"my-cluster\",\"namespace\":\"my-namespace\",\"name\":\"my-name\",\"version\":\"1.0.0\"}"
        }
      }
    ]
  }
}
JSON Pipeline
개발을 할 때 엔지니어가 json 데이터를 Elasticsearch 쿼리로 변경하여 데이터를 넣는 형식으로 개발을 진행한다면 JSON Pipeline은 굳이 필요 없는 기능으로 여길 수 있지만 개발을 하다 보면 앞으로 들어오는 json 데이터의 형식을 모르거나 json 문자열 데이터를 변경할 수 없는 환경에서 개발을 진행해야 되는 경우도 많습니다. 저 같은 경우 Kubernetes의 Resource Manifest 데이터를 가공 처리하는데 Manifest데이터는 yaml 또는 json 데이터로 수집되는데 어떠한 key와 value가 들어오는지 모든 것을 파악하기 어려운 상황을 겪었습니다. 이런 경우 JSON Pipeline을 사용하면 유용하게 데이터를 처리할 수 있을 것 같아 실습 내용을 정리하였습니다.
JSON Pipeline 생성
### 파이프라인 생성
PUT http://localhost:9200/_ingest/pipeline/index-json
Content-Type: application/json

{
  "description" : "ingest pipeline for json",
  "processors" : [
    {
      "json" : {
        "field" : "manifest",
        "target_field": "manifest_json"
      }
    }
  ]
}
파이프라인 생성 파라미터
- json : 파이프라인 프로세서 중 JSON 프로세서를 사용합니다.
- json.field : 문자열 형식으로 들어오는 json 필드를 명시합니다.
- json.target_field : 문자열 필드 형식으로 들어온 데이터를 어떤 필드에 저장할지 지정합니다.
JSON Pipeline 테스트
파이프라인은 simulate라는 기능을 이용하여 내 생각대로 결과물이 나오는지 확인할 수 있습니다.
### 파이프라인 시뮬레이터
POST http://localhost:9200/_ingest/pipeline/_simulate
Content-Type: application/json

{
  "pipeline": {
    "description" : "ingest pipeline for json",
    "processors" : [
      {
        "json" : {
          "field" : "manifest",
          "target_field": "manifest_json"
        }
      }
    ]
  },
  "docs": [
    {
      "_source": {
        "cluster": "my-cluster",
        "manifest": "{\"cluster\":\"my-cluster\",\"namespace\":\"my-namespace\",\"name\":\"my-name\",\"version\":\"1.0.0\"}"
      }
    }
  ]
}
실제 데이터로 JSON Pipeline 적용되었는지 확인
먼저 테스트를 하기 위한 인덱스부터 정의하도록 하겠습니다. JSON Pipeline으로 생성되는 모든 필드들을 지정하기는 매우 번거롭기 때문에 dynamic_template을 통하여 JSON Pipeline이 생성하는 필드를 지정하였고 데이터를 넣을 때는 pipeline=index-json을 통해서 파이프라인을 지정해 줍니다.
### 인덱스 생성
PUT http://localhost:9200/my-manifests
Content-Type: application/json

{
  "mappings": {
    "dynamic_templates": [
      {
        "default_strings": {
          "match_mapping_type": "string",
          "mapping": {
            "type": "keyword"
          }
        }
      }
    ],
    "properties": {
      "cluster": {
        "type": "keyword"
      },
      "manifest": {
        "type": "text"
      }
    }
  }
}

### 인덱스 데이터 삽입1
POST http://localhost:9200/my-manifests/_doc/1?pipeline=index-json
Content-Type: application/json

{
  "cluster": "my-cluster",
  "manifest": "{\"cluster\":\"my-cluster\",\"namespace\":\"my-namespace\",\"name\":\"my-name\",\"version\":\"1.0.0\"}"
}

### 인덱스 데이터 삽입2
POST http://localhost:9200/my-manifests/_doc/2?pipeline=index-json
Content-Type: application/json

{
  "cluster": "my-cluster",
  "manifest": "{\"cluster\":\"my-cluster\",\"namespace\":\"my-namespace\",\"name\":\"test\",\"version\":\"2.0.0\"}"
}
결과 확인
manifest_json 필드를 통하여 json의 데이터가 dynamic_template으로 지정한 타입으로 필드가 생성된 것을 확인할 수 있습니다. 확실한 차이점을 보기 위해 위에서 정의한 "만약 JSON Pipeline을 사용하지 않았다면"의 결과와 비교해 보세요.
### 데이터 검색
GET http://localhost:9200/my-manifests/_search

### 결과 확인
{
  "took": 6,
  "timed_out": false,
  "_shards": {
    "total": 1,
    "successful": 1,
    "skipped": 0,
    "failed": 0
  },
  "hits": {
    "total": {
      "value": 2,
      "relation": "eq"
    },
    "max_score": 1.0,
    "hits": [
      {
        "_index": "my-manifests",
        "_id": "1",
        "_score": 1.0,
        "_source": {
          "cluster": "my-cluster",
          "manifest": "{\"cluster\":\"my-cluster\",\"namespace\":\"my-namespace\",\"name\":\"my-name\",\"version\":\"1.0.0\"}",
          "manifest_json": {
            "cluster": "my-cluster",
            "namespace": "my-namespace",
            "name": "my-name",
            "version": "1.0.0"
          }
        }
      },
      {
        "_index": "my-manifests",
        "_id": "2",
        "_score": 1.0,
        "_source": {
          "cluster": "my-cluster",
          "manifest": "{\"cluster\":\"my-cluster\",\"namespace\":\"my-namespace\",\"name\":\"test\",\"version\":\"2.0.0\"}",
          "manifest_json": {
            "cluster": "my-cluster",
            "namespace": "my-namespace",
            "name": "test",
            "version": "2.0.0"
          }
        }
      }
    ]
  }
}'Elasticsearch > pipeline' 카테고리의 다른 글
| Elasticsearch Ingest pipeline split processor (0) | 2023.10.19 |
|---|---|
| Elasticsearch Ingest pipeline enrich processor (0) | 2023.10.18 |